Friday 22 March 2013

Moving the Globe Artichoke seedling plus progress

I have managed to get through this busiest of busy weeks. It truly is tough to get time to care for too many plants when you are holding down a full time job, helping run a business at weekends and you also have interests and hobbies which come in during the week.

However, today I have taken off work and so I have been able to get some moving of seedlings done (which I wanted to do on Tuesday) and also get round each pot to check on progress. Frankly I have left it too late for some; the Foxglove, having looked so healthy, today I have noticed had dried out and while it's not all dead most of the seedlings are very wilted; a good watering and back on the propagator for a few days before I decide what to do with them, I think.

But I am getting ahead of myself. My first task was to take the Globe Artichoke seedling and move it out of the propagator; it had got so big that I had to take off the lid of the propagator as the seedling was being squashed down!

This is what it looks like now; there is a hole in one of the leaves but I don't think this is a problem. It also already has second growth starting.

I have picked out a large-ish pot to move it to as it does seem to be growing very fast indeed.

The pot is filled with pre-warmed compost taken from my stash next to the radiator. You can see the hole already dug ready for the seedling to be put into.

And here it is, happily set in it's new home and ready for me to decide which of my over-crowded windowsills it should be put on. hmmm...

So that is the extent of my useful progress this week. I have, as discussed earlier, also got to go round and check on progress for all the other plants so...

I have previously talked a bit about how the Crossley Specials are all looking very happy now but some of the seedlings still have evidence of wilting. This is a picture of one of the seedlings which is like that.

This Crossley Special, however, has no such problems and displays no evidence whatsoever of wilting. It is exciting to see the stalks starting to turn red.

I've not put a picture of the mint for a while because it always just looks like mint. I thought I would today though to show you just how quickly and well it is growing.

This is the Moneymaker Tomato seedling which I managed to throw on the floor a few weeks ago. As you can see it is not showing any signs of distress and even has second growth starting to appear.

The other Moneymaker Tomato is also looking healthy and happy in its self watering planter. Unfortunately I have no sign of any growth at all from the Gardeners Delight Tomatoes so they are obviously not really living up to their name just yet :/

The larger of the two Geranium seedlings is now really starting to look established. Is there anything better than planting a seed and seeing it come to life and grow so well? If there is, I don't know what it is!

The smaller of the Geraniums is also growing well and its leaves are starting to show the shape of a Geranium.

The shop bought Coriander and Chives are still inside after their near miss with the snow and a good thing it is as today it is howling a gale outside and snowing.

A detailed picture of one of the seed grown Coriander. I am so pleased with this each pot now contains a very healthy and happy plant. It may even be time to move the ones I am going to keep into larger containers and give away the others to deserving homes.

Back to chillis, these are the Ghost Chilli seedlings which are still in the propagator and are established now. I think I am going to leave them in there until they get too large, as they obviously appreciate the warmer soil.

The two Birdseye seedlings are still going, but as I am always told by my friend, these do not grow fast or large. It feels like all the growth you see happened over two days and then they have stopped for the last week or so. Strange.

Now coming to what feels like the less successful parts of my experimentation; these are the Parsnips which are, truth be told, not look too weak but still I am not totally confident of a good harvest from these eight plants :/

Even worse are the Carrots which all look sad and droopy. I am going to keep watering them, keep an eye on them, and cross my fingers that this year I get at least ONE Carrot to nibble on.

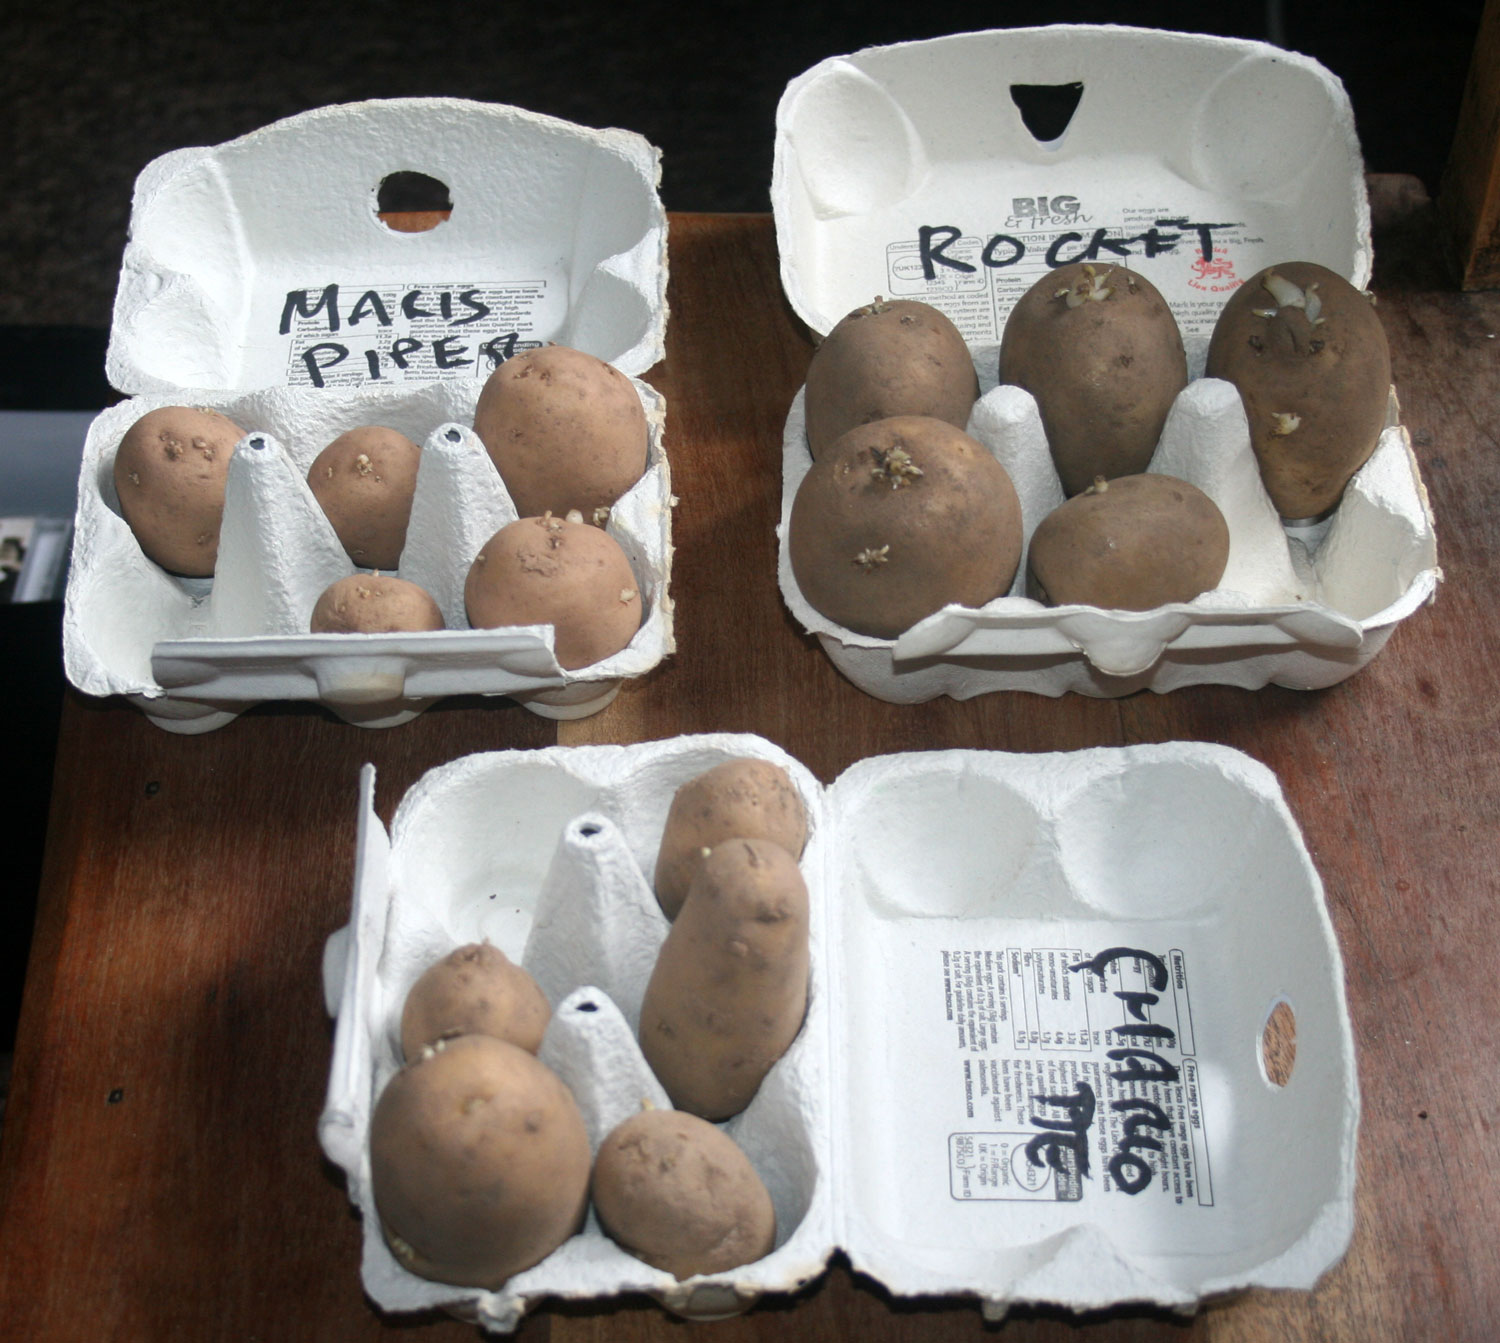
The Potatoes are still chitting, though since last night I have noticed that where the Rocket was putting out nice white looking shoots they now appear black? hmmm

Finally for this a tray of soil which, honest, contains the Begonia tubers. No signs of life yet but hey, they haven't been planted for that long.

So there you have it; a nice full  update of all the progress made. Currently not giving me any joy at all is (in no particular order) the Kerela, the Echinops Ruthenicus, the other Globe Artichoke seedling, the Gardeners Delight Tomatoes and the Oregano and Sage which I am completely sure is totally never going to grow at all.

Lastly for this update I have taken a picture of our dining room, which I like to call my Nursery. I have the heated propagator on the windowsill, Carrots, Parsnips and Potatoes on the chairs, Coriander, Chives, Geraniums and Tomatoes squeezed in on CD racks and in spaces on the windowsill. There is NOT much space at all!


Cheers

Sunday 17 March 2013

Starting to plant potatoes and repotting the Parsnips

Happy weekend everyone :)

At the end of last week the final part of my bumper-order arrived which was my potato planters and some seed potatoes. Yesterday, therefore, I got all excited and decided to get them planted out.

These are the three shiny clean planters just out of the box. And yes that IS sun you can see in the picture. I know, it's been so LONG since we saw it!

Not so clean now, the instructions that I had read up to this point in time told me to fill the bag about one third full and plant some seed potatoes at that depth. So this is what I am doing...

... however after filling two of the three planters to that depth (just about) I recalled my hard-learned-lesson and thought "ooooh - I should be warming this up before planting". So this is one of the large bags of compost next to the radiator and I also brought the other two bags in after taking this picture.

I also read the rest of the instructions and discovered that they recommend that you Chit the Potatoes prior to planting into warmed soil anyway so this brought a resounding stop to my "let's plant some potatoes" plans for this weekend. I have, however, set them a-chitting...

Three egg boxes from the stack I have saved now finally coming in slightly useful.

The Maris Piper seed Potatoes set with the sprouting end upwards in the egg box which is clearly marked for future reference.

Five Rocket Potatoes set out for chitting.

And finally the Charlotte Potatoes wedged in.

These three egg boxes are now sat on a chair in the dining room next to the window as that room is cool and has plenty of light; my effort to take over the entire house with growing stuff is going well :)

So now I just leave these for a while; some websites are suggesting six weeks which just will NOT happen - I'm going to leave it until all of them have some good green showing, and then get them in the planters and outside...

To make up for the disappointment of not being able to plant my Potatoes, and also to make space on the boards next to the radiator, I have decided to take the sprouted Parsnips and put them into deeper soil. This is the first one to be moved.

All the Parsnip seedlings re-potted. I am a bit disappointed with my yield from the Parsnips and Carrots; I have probably only got about 65% seed success. I will not bother with the effort of singly planting these root crops again; next time I do it I will plant as I did last year, into grooves in the soil and using lots of seed up (but I will remember to bird-proof the seedlings too).

So, finally for this super long blog post, I have a couple of updates then I'll let you get on with your day...

First of all the second Birdseye Chilli has sprouted. This picture was taken on Saturday and when I checked this morning it was already about twice as big as this.

The shop bought Coriander is now fully back to life and looking strong and healthy. If you look to the right edge of this picture you will see stubs where leaves have been picked; this is providing us with tasty additions to curries regularly already.

Outside, the Broccoli appears to be putting on a growth spurt and the leaves are starting to take on a less "juvenile" shape. Here's hoping we can be eating this soon too.

By contrast the Onions have not really done much at all; this picture nicely shows the success I have had with each seed as you can clearly make out the V shape I planted the seeds in.

Lastly for outside the Lettuce is still pathetic and small... come on little seedlings, get big so I can eat you!

Finishing with a success story; the seed grown Coriander, which was looking so unhappy in the rubbish planting material the seeds came with, are now really strong looking and potentially I will be ready to give a couple of these away to deserving people. Shout now if you want any?

So, there you have it... I will keep a photo diary of the potatoes and may bore you yet with a day by day chitting progress report when I get round to planting them.

I'm hopeful for another guest blog post shortly too.

Keep growing.

Thursday 14 March 2013

First sight of Birdseye Chillis and other things

So a brief update today, just focused on some progress I spotted which inspired me to take photographs of various green growing things.

I'll get straight into it...

Leading off with the most exciting of the progress, the thing which inspired this whole post. This is the first Birdseye Chilli seedling which appeared literally over night (as they do) and is already 15mm tall. Now I am going to be checking every day for sight of the other seedling.

This is one of the Carrot seedlings I transplanted thinking it was dead. As you can see I was wrong. The white stain is the ring caused by the toilet roll which is now fully buried and rotting away.

The Parsnips are still in their toilet rolls and are growing well; think these will be a transplant job for the weekend.

The two Ghost Chilli seedlings are looking well established and are showing second growth now; from memory this presages a bit of a growth spurt so maybe soon I will have to put these into a larger container too.

The Globe Artichoke seedling which appeared so quickly has continued it's super fast growth and is now almost too big for the heated propagator tray. It's mate still hasn't put in an appearance though.

I'm still waiting for some advice about the Foxglove seedlings, which it seems to me have looked pretty much like this for weeks now. Should I be moving these into a bigger space? Or wait a little longer....?

The Moneymaker Tomato seedling still only with primary leaves but looking strong. The Gardeners Choice have not yet put in an appearance, but the seedling I threw on the floor (not pictured) is actually still alive and well.

The large Geranium seedling which is growing again and slowly shedding the dirt I scattered on it by accident. The smaller seedling is still only in early stages and does not show the leaf style of a Geranium yet.

Last but by no means least this is one of the Crossley Special Chillis. These are now really starting to look strong and healthy and I have a lot of hope for a good crop this year. You can see that it is really starting to put leaves on now and these, as commented earlier, really help to turbo-charge the growth of the plant.

So that is it for now; just a quick update around a few of the seedlings.

I will do a full update at the weekend if I get time.

Keep planting and growing.

*** EDIT ****

I almost forgot, I have a little update on the shop bought Coriander and Chives. If you remember I brought them in because of the snow and they were looking very unwell indeed.

While not looking incredibly healthy I think I can comfortably say the Coriander has survived.

While the Chives are not looking quite as good I think they may survive also.

Thanks to everyone who said encouraging things to me about these plants, including but not limited to my Uncle Alan.

They made it!

Monday 11 March 2013

Planting Begonia tubers

At the weekend another part of my huge seed/tuber order arrived so Sunday morning I decided to plant them out. The packet said "plant immediately" which put a bit of fear in my mind as to what would happen if I didn't.

I am not sure if, post growth, I will be able to re-harvest the tubers and take them with me to my full time homesteading destination (any advice welcome) but hey, if they will die if I don't plant them now I'm not going to put them in my seed-bank to take with me because that would just be a waste.

Anyway, following on from my so-recently learned lesson my first task was to bring in and warm up some compost.

The five three inch plant pots brought in and filled with compost and sat next to the radiator, alongside the Carrots and Parsnips and Geranium seedlings. This surely is final proof that yes, I do learn from my mistakes.

I have never bought tubers before and this is the bag which they came in; it was a very lightweight material and had lots of holes in it to keep the tubers dry and aerated.

This is a Begonia tuber. Yes, I know what it looks like but trust me; it is. I am holding it "hollow side up" which, apparently, is the way you plant them also.

The method of planting which the instruction leaflet said (yes, I know, I read the instructions... How can I ever look my dad in the eye again!) said to put it on the compost hollow side up, carefully push under the surface, and water thoroughly, making sure however to not let water pool in the hollow. So that is what I did...

... I didn't get any pictures of that part of the process so you will just have to trust me when I tell you that this is a picture of the previously shown pots, post compost warming, with a tuber in each one, carefully pushed in and watered without allowing water to collect, yes you guessed it, in the hollow on the tuber.

Bear in mind that I brought the compost in at about 8am on the Sunday morning and then did this planting at about 11pm so this gives an idea that you can decide to plant something in the morning, and have warm enough compost in the evening, so long as you have your heating on.

Finally a couple of pictures to show that the heating of the compost really does work. This is a picture of two Carrot seedlings still standing up strong and tall and not wilting in the slightest. The mildew appears to have reduced also, though the soil still has some moisture in it. This is, I think, a success so far.

The Geranium seedling is also still looking just as it did prior to re-potting, another successful move operation. I did accidentally scatter some compost on the leaves while moving it but I don't think it will stay on there for long when the plant continues to grow.


Anyway, there you are; some more plants ready to start obsessively watching for progress, and some more proof that yes, you really should be aware of the temperature of your compost when moving seedlings from propagator to medium pot.

Cheers